The Back Story

Wednesday, December 13, 2017

Mixed Media Post Card

My daughter and son-in-law recently
returned from a wonderful trip to Denmark.

Everywhere they went, they saw long
white taper candles in simple holders. 

Whether on restaurant tables,  
in store front windows, or in the windows 
of private homes, they saw these candles. 

As a gift and reminder of their trip they bought each
family member their own taper,
holder, and card wishing the "hygge" life for us. 

Hygge (hue-gah) is the Danish ritual
of enjoying the simple pleasures of life
(a sentiment I'm all about embracing). 

As a thank you, I made them
this mixed media post card. 

I used acrylic paint, collage papers,
stamps, ink, fabric paint, and little plastic "jewels". 


Hopefully this small
gesture will add to the hygge
of their lives. 


Sunday, December 3, 2017

Christmas Folk Art

I've been working on some
folk art pieces for Christmas
the past few days. 

It's been so much fun painting them! 

That's what it's all about isn't it?


They've only taken me
about a day each to finish,
which is a record for me. 


I put on a relaxing Christmas youtube
music video and went to work painting. 


I'll share a couple more I'm finishing 
up next time. 

Wishing you peace and joy
this holiday season. 

Monday, November 27, 2017

Bowl Cozies

A couple years ago I received a 
bowl cozy as a gag gift. 

As it turns out, that had to be
one of the most useful gag gifts
I've ever gotten. 

We eat a lot of hot foods
in bowls, from soup to
rice with vegetables, and of course, 
our morning oatmeal routine. 

I'm always heating up a bowl 
of something in the microwave. 

Since these have come in 
so handy for us, I decided to
make a bunch for Christmas gifts.


I've picked up a few helpful hints
that have made the process of making
multiples much easier. 

First I made a 10" template out
of cardboard which included the triangles
for the darts. This saved a lot of time measuring. 

There are several good instructional videos
online that will give you measurements
for the right size bowl you're looking for. 

I cut the cotton batting an inch smaller (9")
than my fabric (10"). This made finishing much simpler. 


My last helpful tip is to work
in an assembly line process
instead of making one at a time. 

This saved me so much time and 
was much more efficient.

I hope our recipients get
as much use out of these as we do!


Monday, November 13, 2017

Travel Pillow Case

My little travel pillow is one of those
things that ranks right up there with my 
toothbrush when it comes to daily use. 

From cushioning sore bones at night,
to resting on my lap while I drink
my hot tea and chat with my husband
on our couch, it's never far from me. 

I've made at least half a dozen
custom pillow cases over the years for it. 

They're so much fun because I can
play around with some funky combinations
and fabrics. 


I've been happy with the
way they've all turned out with
the exception of the inside. 

My raw edges were exposed and
would fray and tangle and make
an ugly mess if you ever took a peek inside. 

Well I was really excited this time, 
because I finally learned how to 
do a french seam!! 

It's just as beautiful on the inside
as it is on the outside (if I do say so myself). 


It's so much fun learning 
a new skill an upping my
game (especially as I get older). 

I'm already gathering material
for my next one. 


Sunday, November 5, 2017

New Folk Art Dog House

There's a bit a humor
related to this latest project. 

My husband decided he wanted
to build a dog house for a larger dog.

He'd built several for 
small dogs, but this is his
first one in this size. 

He also wanted to make
it more comfortable for me
to work on, so he built it in our
family room!

The problem arose once it
was finished and we needed
to get it out of the house and 
into the garage. 

We only had one inch to spare around
the front door frame, it had to
be turned on it's side to get it out,
and the thing weighs a ton!

He ended up building a contraption
with wheels and figured out a way
for us to remain safe, but it wasn't easy
and we won't be doing that again! 


We just bought some
material to start on a second one. 

This time it'll be built and 
completed in the garage! 

Tuesday, October 31, 2017

Halloween Door Decor


I spent a good part of this past
weekend making some holiday decorations.

There's a great youtube video I watched
about making tissue paper flowers.

They were so much fun to make!
I would've made more had I not
run short on tissue paper. 


I asked my husband to cut out
a skull shape that I'd drawn
onto a piece of plywood. 

He kindly base coated it white
for me and then I took it from there
with a simple folk art design. 


Years ago, my daughter made the circle
felt garland, so I grabbed that from the picture
it'd been hanging over. 

I cut out patterned felt half circles with pinking shears and sewed
them to some colorful ric rac for a cute little bunting. 

Adding the string of holiday beads seemed
to finish it off. 


Hoping the little trick or treaters
will enjoy it tonight. 


Happy Halloween!

Friday, October 27, 2017

Painted Chicken Coop 3

 First of all, I need to give
credit to Aimee from the Farm
Animal Sanctuary for these pictures. 

I forgot to bring my camera and 
she was kind enough to take these. 

My husband put in the hinged door 
within the front door. 

This way the chickens
can get in and out without having to open
the larger door. There's a little carabiner at the 
bottom that can secure the door shut, or hold it open. 


The back wall has 3 panels with decorative
wood strips in between. 


For the benches, I decided to paint a 
rug design in predominantly gray to
hopefully camouflage the inevitable mess. 


Here's Bob attaching the carabiner
to the chicken wire to hold the door open. 

That's Zobe the beautiful little zebu cow
in the background. 

I just love her!!


We've had so much fun
helping to beautify the farm.

It's been an honor and a privilege. 


Thursday, October 12, 2017

Canoeing Clear Creek Reservoir

My husband has the week off
and I've been taking a break from my artistic 
endeavors to spend some quality time with him. 

We decided to load up our canoe and
head up north to enjoy this
beautiful state of ours. 

Our final destination, Winslow Arizona. 

For those not familiar with the town, 
there's actually a corner in downtown Winslow 
where you can stand near a reflection of
a flatbed Ford in a window and 
take your picture next to a statue of Glenn Frey.

That said, as you'll see from the pictures, 
there's another fine sight to see when you're there. 

It's called Clear Creek Reservoir and
it's a hidden gem. 

We started our adventure at McHood Park.

Near the camping area, there's
a large gravel parking lot and a nice dock
to put in the water. 


The mirror reflection of the
cliffs on the water was absolutely gorgeous. 

The water was so still and the temperature outside 
was a perfect 74 degrees. 


The farther we went, 
the higher the cliffs got, and
the more narrow the canyon. 

We were the only ones
on the water the entire 6 mile 
round trip!


We came across this niche
in the rock and my husband
said it was just missing a statue,
so I obliged. 


Oh the things we get ourselves into. . . 

You should've seen me trying to
get back into the canoe after that 
shot was taken!


It took us an hour and a half
of paddling to get to the end and only  
an hour to get back. 

(I was working a little harder
on the way back). 

This was just a day trip from
Phoenix and we were
back home in the Valley before sunset. 

This place is a must see if
you get the chance! 

We have some treasured memories
of our visit there and look forward to 
going back again. 


Wednesday, October 4, 2017

Painted Chicken Coop 2

I finished painting the panels for 
the outside of the chicken coop, and
yesterday was delivery day. 

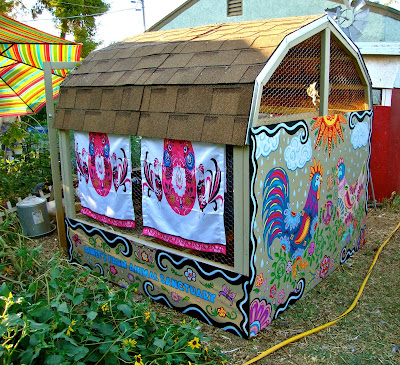
Here's a picture of the brand new
coop we had to start with. 


Here's the outside all prettied up!

The flags belong to Aimee the owner. 
They're a cute folk art rooster print
and fit right in with the design, so
I think she'll leave them up. 

My husband used liquid nails and 
his nail gun to secure the panels. 


This handsome guy is checking out his new digs. 


I hope he likes it!


My husband is measuring the inside
for the next part of the project. 

That needs to be pretty too. 


Peace, love, and chickens. . . 

Terri


Friday, September 29, 2017

Painted Chicken Coop

I've been painting a wood panel that'll be
attached to the chicken coop 
my husband Bob measuring in 
the picture below. 

There's just no way I could paint it 
on location, so this is the solution we
came up with. It'll actually add
additional support to the structure,
as well as making it pretty. 


I'm going to call this first
panel finished. 


Fortunately the biggest panel is
behind me. 

That said, I have four more ahead of 
me that I want to finish by Monday!

Lord help me!

Terri

Thursday, September 21, 2017

Picnic Table No. 2

I'm happy to say I finished the second picnic table
for Aimee's Animal Farm Sanctuary
and thought I'd share some pictures of it with you. 

Unlike the first picnic table, this one
started out painted in a solid red color. 

It'd been placed in a part of the yard that gets
watered by irrigation, which means it was regularly 
sitting in water for extended periods of time. 

The legs were all rotted and my handy 
husband needed to replace those before
I could get started. 

As you can see, my palette colors were gray, blue,
green, and purple tones. It wasn't a typical 
palette for me, but I like the way it turned out. 


You can see a tiny part of the first table
I did in the background. 

My intent was for them to compliment
one other in style, without being too matchy-matchy. 


Now, I've got to get back
to the chicken coop panels I'm painting. 

More on that later. 

Thanks for visiting!

Terri

Thursday, September 14, 2017

My Painting Process

 There's a local PBS show I watch
from time to time called Books & Company. 

The host of the show interviews a particular
author and inquires about his or her book 
and their personal process
of writing and developing their stories. 

I love hearing about the different ways
they go about it. 

I know many artists travel similar unique
paths to end up with their finished pieces. 

Those kinds of things fascinate me, whether
it be an artist of the word, paint brush, 
or musical instrument.

Today I'll briefly share one of the ways
I go about painting my pieces by
sharing some of my works in progress in
the earliest stages. 

I'm working on a dog house and another
picnic table. One's in my family room,
and the other's in the garage, so the pictures
aren't the greatest, (thanks to poor lighting)
 but you'll get the gist. 

Before I start any piece I pray. 
I ask God to bless the work of my hands
and to guide and lead me as I create the design
and paint the piece. I ask that it'll be a blessing
to whomever it ends up going to. 

After that, I don't worry about it how I'm going 
to proceed, I just start with one element and
let the design flow from there. 


I always use one color (usually a dark one)
to get my basic design down. 


This is what I call free hand folk art. 

I have had to be more precise in the past
with a design image, and in that case
I'll draw it out on transparencies and
use the overhead projector to complete 
the design that way. 


I did the base design in the following picture
and started in with my first color. 

That's what I usually do. Then I'll 
go back with one color at a time and
continually add to the design until it feels and 
looks done to me (which can take a while). 

My husband always says, when he's dizzy,
he knows I'm finished. 


I'll be sure to post the finished
pieces, (hopefully in better lighting)
so you can see how they turned out. 

Until then, may God bless the work of your hands. 

Terri

Wednesday, September 6, 2017

Painted Picnic Table

Imagine painting in an enclosed garage
without air conditioning and the temperature 
is over 105 degrees.

I had to keep the garage door shut because
it's monsoon season, and that means mosquitoes. 

Did I mention mosquitoes love me?

The affection isn't mutual. 

Although the working conditions weren't ideal,
I was in the zone and loving every minute of it. 

I made sure my glass of ice water was filled
and I was staying hydrated. 

It took me a solid 3 1/2 days to finish
and I'm pleased with the results. 


Delivery day was yesterday
and I'm so happy the dear
lady I painted it for loved it. 


Oh, to make a living at painting. . .

That'd be my dream. 


Terri

Thursday, August 17, 2017

Successful Delivery!

Delivering Ziggy's house
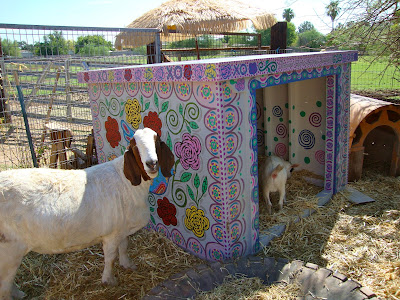
was rather worrisome for me. 

I knew once we got it to the farm we'd
have help, but I didn't know how my
husband and I were going to load this several
hundred pound house on our truck by ourselves. 

Thankfully my husband invested a lot of planning
and forethought on that part and all went well. 

Aimee had a fine group of willing and able volunteers
who made bringing it to it's new location a cinch. 


Once we got it to the penned in area, 
we had to lift it over the fence.

Working in tandem, the house just glided
over the top to the other side. 

Thank You Lord!


We kept the roof separate to lessen
the weight. My husband Bob secured it
with hurricane clips once we got it in place.

That roof isn't going anywhere!


All the animals had to come and check
out the new digs. They all seemed to love it. 


But the best news of all is
that Ziggy loves it too!


I'm so grateful. . .

~for people in 
this world like Aimee Takaha. 

~for places in this world
like Aimee's Farm Animal Sanctuary.

~for the special people who
volunteer their time at places like this one. 

And, I'm so grateful for the opportunity we
had to make one corner of it a little more colorful.

Terri


Tuesday, July 25, 2017

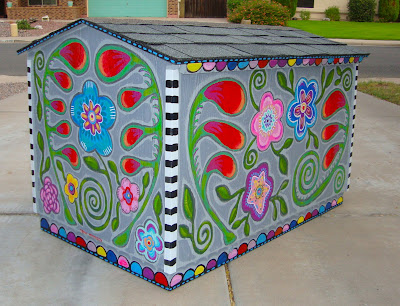
The Hog Haven

Today I'm going to share a sneak
peek of what's kept me so busy
the past week or so. 

Everything from cleaning house, exercising, 
doing laundry, and blogging fell to the wayside
 while I worked on this project. 

It's a house my husband built for
a 300lb baby hog that'll grow to be 600lbs!

I've been painting from sunrise to sunset
for the past 7 plus days in a row. 

It'll soon be headed to a wonderful
Farm Animal Sanctuary near our home. 


One of the greatest things about
this project was recognizing how
many times I thought to myself, 
"This is so much fun!"

That's saying something considering the fact
that I was working in an non air conditioned garage
in Phoenix, in the middle of summer!

The temperature was never less than 100 degrees,
but I was loving every minute. 

It feels good to be done. 

Now it's time to get to my household chores!

Thanks for stopping by.

Terri

Tuesday, July 11, 2017

Mixed Media Drawing

I have a love hate relationship
with this drawing. 

I'm happy with the face, 
the basic design and the balance
of the drawing as a whole. 

The headdress is so flat
though. It bugs me. 

Even if I tried shading it, it 
wouldn't help. That part of 
the drawing is off. 


I call it Mardi Gras, because that's
what it reminds me of. 

Not that I've ever been, but it's what I'd
imagine seeing someone in a Mardi Gras
parade looking like. 

Well, I guess it's back to the "drawing" table for me.

Have a wonderful day.

Thanks for stopping by. 

Terri


Friday, July 7, 2017

Mixed Media Paper Quilt


I love to quilt and this
time I decided to put an 
artistic spin on it. 

The 12 main squares are
individual magazine collages. 

I took my time to make each
one as if it was it's own little
piece of art. 

Next I created an op art border.

I wanted to surround the colorful
centers with a black and white neutral design.

Small red squares were chosen to accent
the quilt. It's actually red duct tape
covered card stock. 

I used the zig zag setting on my machine
 to stitch it all together. 


It was fun to create and
the possibilities are endless. 

Thanks for visiting!

Happy creating.

Terri

Wednesday, July 5, 2017

Folk Art Bird House 5

This bird house gave me a little
trouble at first. 

My initial idea for it (which I was
really excited about) bombed when 
I told my husband what I wanted to do. 

He told me how hard he worked
on certain features and I was going to cover
them up with my idea. I could see his point 
(after a long discussion) and I decided 
to move on to a plan B. 

By the way, after this incident, we made
the decision that he'll do his thing when it
comes to building, and I'll do my thing when
it comes to painting. Our team projects have been
harmonious ever since.

Back to plan B. .  . I had to come up with
a new idea, and instead I just sat and sat in
front of this thing, starting at it and 
wondering where to start. 

Ever been there yourself?

After a grueling amount of time passed I 
decided enough was enough. 

I set a timer for 20 minutes and started painting
a base design without thinking about it. 

"Just paint!" I told myself. 


After all was said and done,
I really liked the way it turned out. 

Sorry my pictures aren't the best.
I keep this bird house in my daughters
old room and the lighting isn't the best. 

I think the gist of it comes across though. 

Hope you have a fabulous day!

Happy Creating. 

Terri